本教程基于Ubuntu16.04和window10 wsl。
hexo安装配置
安装npm
1
2
3
4
sudo apt-get install npm
npm --version
3.5.2npm换国内源
1
npm config set registry http://registry.npm.taobao.org/
安装node
1
2
3
4
sudo apt-get install nodejs-legacy
node --version
4.2.6更新node版本
1
2
3
4
5
6
npm install -g n # 安装n
n stable # 安装最新稳定版node
重启一个shell
node --version
v12.16.2安装hexo
1
2
3
4
npm install -g hexo
hexo version
hexo-cli: 3.1.0到一个文件夹下初始化hexo环境
1
2
cd /path/to/blogs/
hexo init # 此时会clone hexo环境和一个初始化的landscape主题有时候可能因为网络限制,出现clone主题失败,这时按照WARN说明先执行
npm install安装依赖,然后直接去github下载主题,解压放到./themes文件夹内,并将其重命名为landscape即可。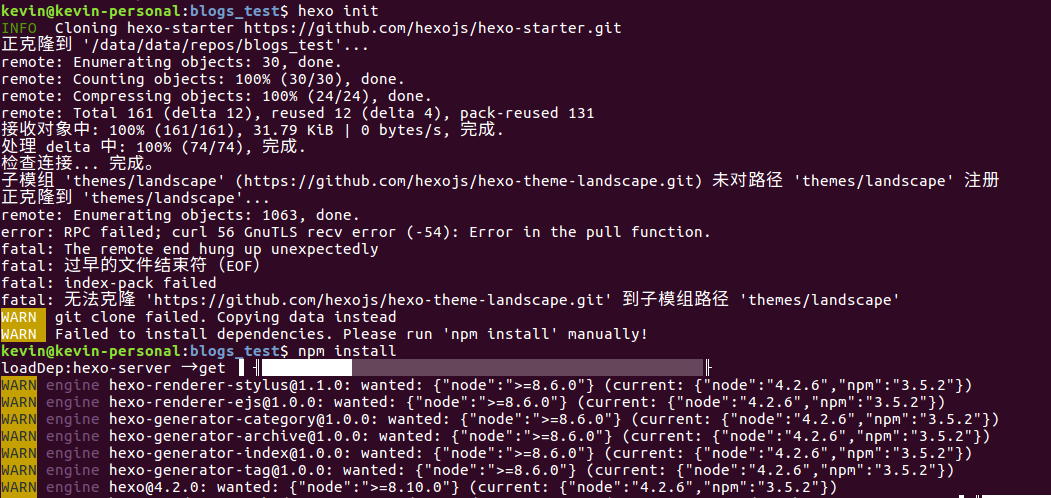
图1 npm init错误
- 开启hexo服务,可以看到一个很基础的博客已经搭建起来了
1
hexo s -p 4001 # -p 可以指定本地端口,具体help可以使用 hexo s --help 查看
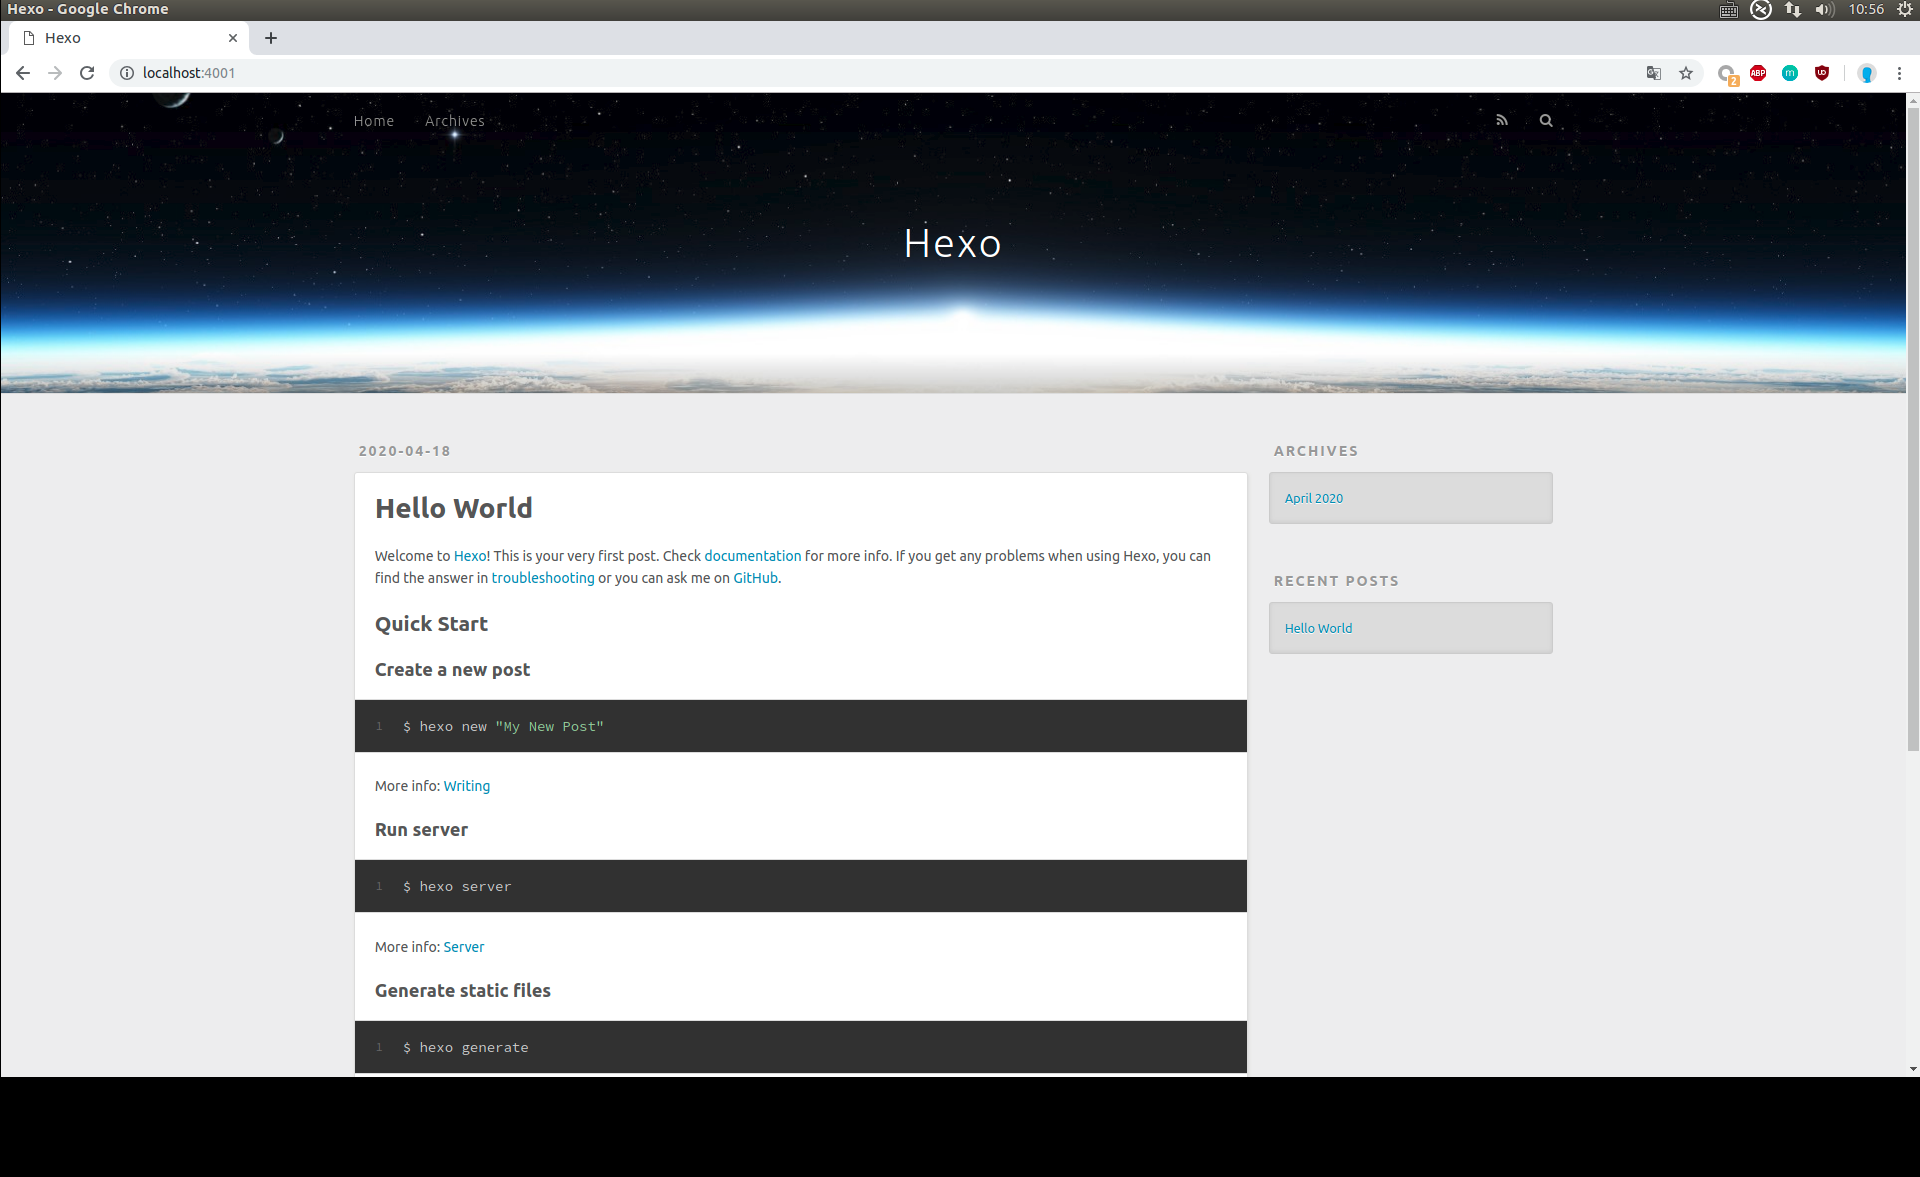
图2 初始化博客页面
next主题安装配置
默认的landscape主题不怎么好看,这里选择了热度最高的next主题作为博客的主题,因为个人觉得热度最高的主题,维护较好,出现问题也有较多人可以提供解决方案。首先在hexo主题官网搜索next主题,跳转到next的github地址后,下载主图库,解压后同样放在博客目录下的./themes/中,并重命名next主题文件夹为next。
注意:这里有两个配置文件,一个是博客目录下的./_config.yml,另一个是主题目录下的./themes/next/_config.yml
修改博客配置文件
./_config.yml,将主题设置为next1
2
3
4
5
6
7
8
9
10
11# 大概在96行,每个版本的hexo配置文件可能不一样
# Extensions
## Plugins: https://hexo.io/plugins/
## Themes: https://hexo.io/themes/
theme: landscape
# 修改为
# Extensions
## Plugins: https://hexo.io/plugins/
## Themes: https://hexo.io/themes/
theme: next重新开启hexo服务
1
hexo s -p 4001 # 需要把原来的服务杀掉,否则报端口被占用错误
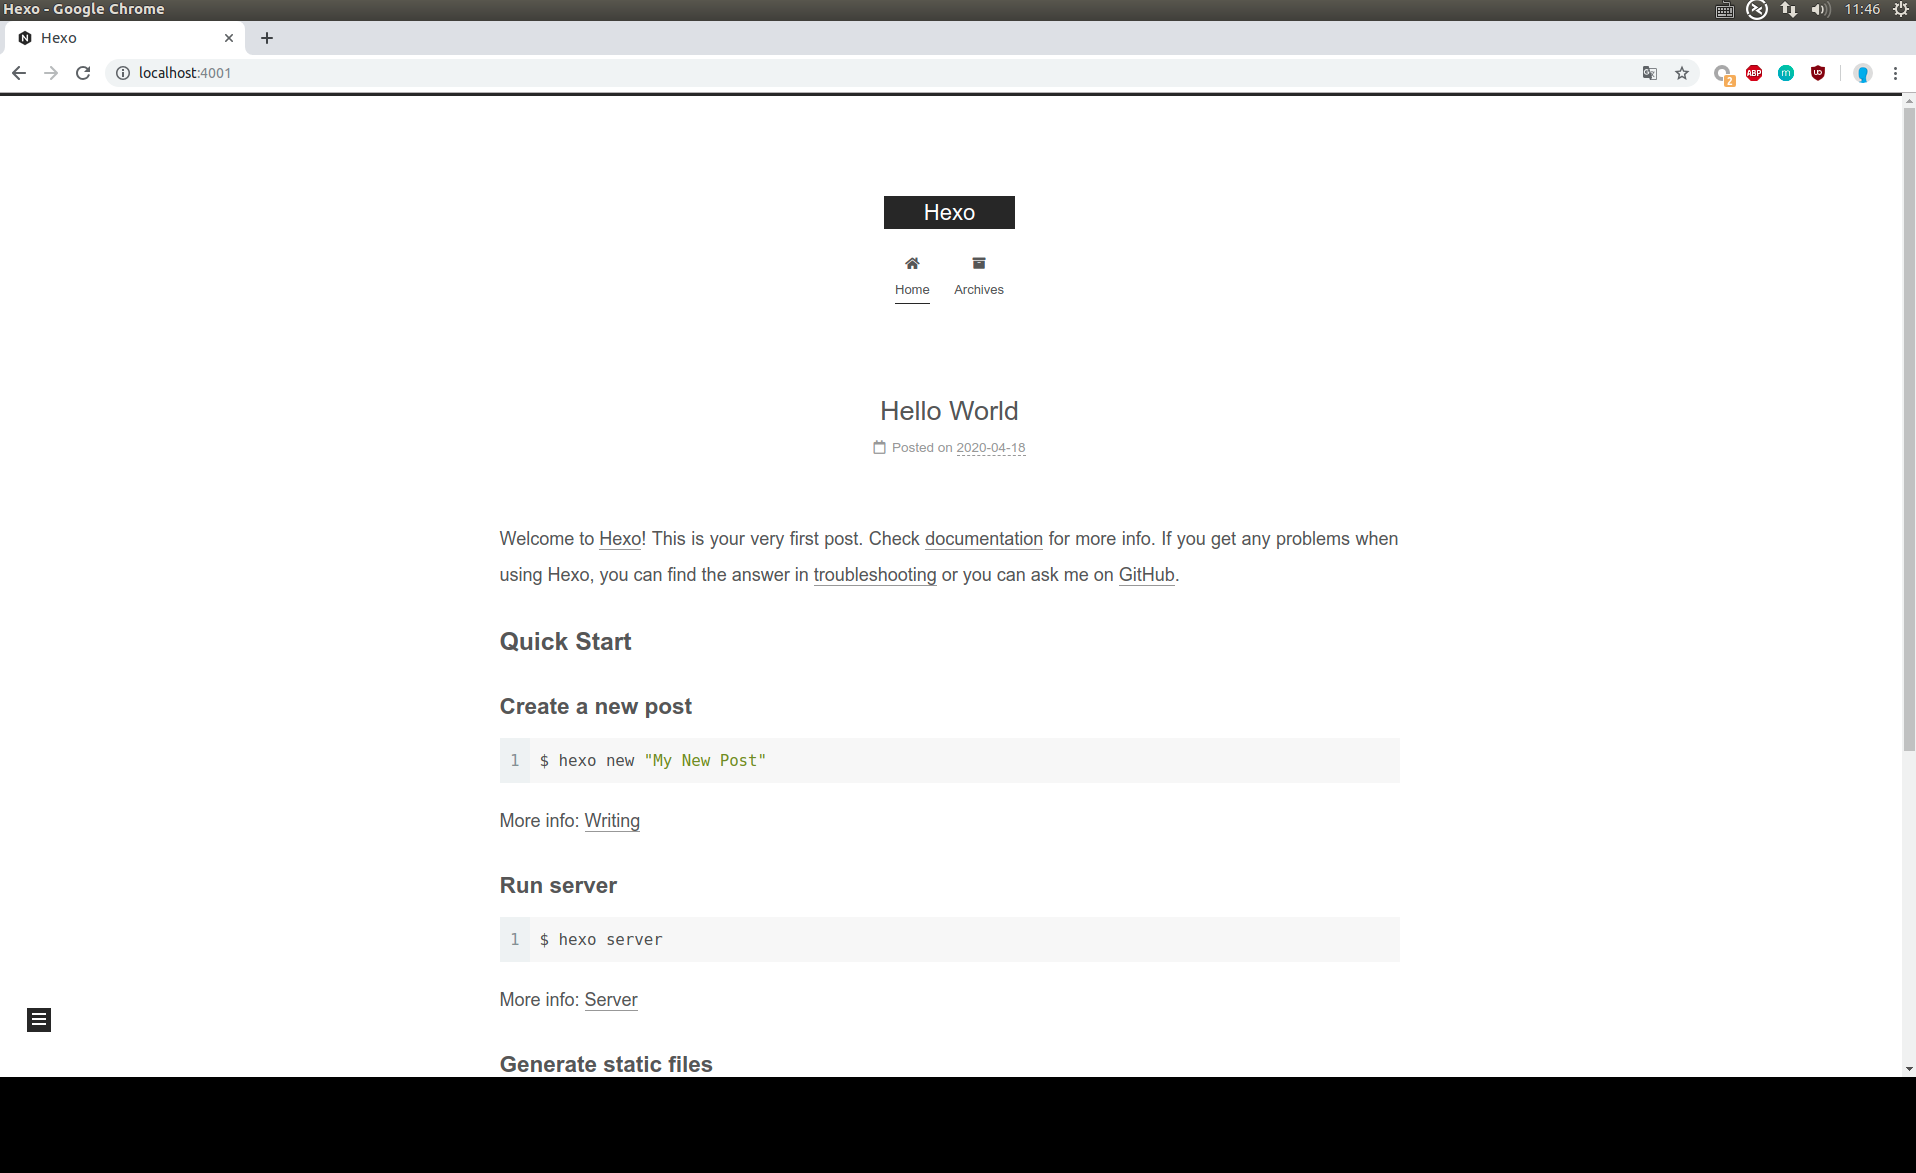
图3 hexo-next初始化界面
博客优化与配置
基础配置只要修改两个配置文件 ./_config.yml和./themes/next/_config.yml.
配置主页
Site内容:打开博客配置文件./_config.yml, 修改相应内容1
2
3
4
5
6
7# Site
title: Hexo_test # 主页标题配置
subtitle: Hexo_test_subtitle # 主页副标题配置
description: 'this is a hexo test' # 主页描述
keywords:
author: "Hexo tester" # 主页作者
languate: zh-CN # 主页语言设置,更多语言可以查看 ./themes/next/languages 中的语言配置文件配置主页的icon:打开主题配置文件
./themes/next/_config.yml,icon保存在博客路径的 ./public/images,将相应的icon复制到此目录下,并将配置文件中的文件名字修改为文件夹内文件的名字即可1
2
3
4
5
6
7favicon:
small: /images/favicon-16x16-next.png
medium: /images/favicon-32x32-next.png
apple_touch_icon: /images/apple-touch-icon-next.png
safari_pinned_tab: /images/logo.svg
#android_manifest: /images/manifest.json
#ms_browserconfig: /images/browserconfig.xml去除博客底部的
由 Hexo & NexT.Muse 强力驱动:打开主题配置文件./themes/next/_config.yml1
2# Powered by Hexo & NexT
powered: false添加
since xxxx year,否则默认是当年:打开主题配置文件./themes/next/_config.yml1
since: 2020
博客底部小icon设置(默认是红心):从Font Awesom找一个喜欢的icon,打开主题配置文件
./themes/next/_config.yml1
2
3
4
5
6
7
8# Icon between year and copyright info.
icon:
#Icon name in Font Awesome. See: https://fontawesome.com/icons
name: fa fa-heartbeat
# If you want to animate the icon, set it to true.
animated: true
# Change the color of icon, using Hex Code.
color: "#ff0000"copyright设置
1
2# If not defined, `author` from Hexo `_config.yml` will be used. 默认是author
copyright: hexo testscheme设置,这里选择了Pisces
1
2
3
4
5# Schemes
#scheme: Muse
#scheme: Mist
scheme: Pisces
#scheme: Gemini配置暗黑模型
1
darkmode: true
配置主页菜单
1
2
3
4
5
6
7
8
9
10
11
12
13menu:
home: / || fa fa-home
about: /about/ || fa fa-user
tags: /tags/ || fa fa-tags
categories: /categories/ || fa fa-th
archives: /archives/ || fa fa-archive
#schedule: /schedule/ || fa fa-calendar
#sitemap: /sitemap.xml || fa fa-sitemap
#commonweal: /404/ || fa fa-heartbeat
menu_settings:
icons: true # 显示图标
badges: true # 显示数量侧边栏配置
1
2
3
4
5
6
7
8
9
10
11
12
13
14
15
16
17
18
19
20
21
22
23sidebar:
# Sidebar Position.
position: left
#position: right
# Manual define the sidebar width. If commented, will be default for:
# Muse | Mist: 320
# Pisces | Gemini: 240
width: 240
# Sidebar Display (only for Muse | Mist), available values:
# - post expand on posts automatically. Default.
# - always expand for all pages automatically.
# - hide expand only when click on the sidebar toggle icon.
# - remove totally remove sidebar including sidebar toggle.
display: post
# Sidebar padding in pixels.
padding: 18
# Sidebar offset from top menubar in pixels (only for Pisces | Gemini).
offset: 12
# Enable sidebar on narrow view (only for Muse | Mist).
onmobile: false侧边栏头像设置
1
2
3
4
5
6
7
8
9
10
11# Sidebar Avatar
avatar:
# 图像地址,可以是在线图像,也可以是保存在 ./public/images/ 里面的图像
url: #/images/avatar.gif #
# 是否圆形头像
rounded: true
# 是否旋转
rotated: true
# Posts / Categories / Tags in sidebar.
site_state: true设置侧边栏社交
1
2
3
4
5
6
7
8
9
10
11
12
13
14
15
16
17social:
GitHub: https://github.com/kevin0048 || fab fa-github
E-Mail: mailto:wzhu0048@gmail.com || fa fa-envelope
#Weibo: https://weibo.com/yourname || fab fa-weibo
#Google: https://plus.google.com/yourname || fab fa-google
#Twitter: https://twitter.com/yourname || fab fa-twitter
#FB Page: https://www.facebook.com/yourname || fab fa-facebook
#StackOverflow: https://stackoverflow.com/yourname || fab fa-stack-overflow
#YouTube: https://youtube.com/yourname || fab fa-youtube
#Instagram: https://instagram.com/yourname || fab fa-instagram
#Skype: skype:yourname?call|chat || fab fa-skype
知乎: https://www.zhihu.com/people/kevin0048 || fab fa-zhihu
social_icons:
enable: true
icons_only: true
transition: false侧边栏章节目录设置
1
2
3
4
5
6toc:
enable: true # 是否显示章节目录
number: true # 是否显示章节序号
wrap: true # 标题过长是否换行
expand_all: false # 是否显示所有的章节
max_depth: 6 # 最大深度打赏配置
1
2
3
4
5
6
7
8
9
10reward_settings:
enable: true
animation: true
comment: 您的支持将鼓励我继续创作.
reward:
wechatpay: /images/wechatpay.jpg # 图像保存在 ./public/images/
alipay: /images/alipay.jpg
#paypal: /images/paypal.png
#bitcoin: /images/bitcoin.png配置follow me,把相应的网址改为你的渠道网址
1
2
3
4
5
6follow_me:
#Twitter: https://twitter.com/username || fab fa-twitter
#Telegram: https://t.me/channel_name || fab fa-telegram
#WeChat: /images/wechatpay.jpg || fab fa-weixin
#RSS: /atom.xml || fa fa-rss
知乎: https://www.zhihu.com/people/kevin0048 || fab fa-zhihu生成tag/categories
1
2
3
4
5
6
7
8
9
10
11
12
13
14
15
16
17在博客目录./上执行
hexo new page categories
hexo new page tags
修改 source/categories/index.md, 加上一行 type: "categories"
---
title: categories
date: 2020-04-18 16:31:58
type: "categories"
---
修改 source/tags/index.md,加上一行 type: "tags"
---
title: tags
date: 2020-04-18 16:31:58
type: "tags"
---
gitub banner设置
1
2
3
4github_banner:
enable: true
permalink: https://github.com/kevin0048
title: Follow me on GitHub托管github
在github上新建一个
github用户名.github.io的仓库,如myname.github.io修改博客配置文件 ./_config.yml
1
2
3
4deploy:
type: git
repo: git@github.com:myname/myname.github.io.git
branch: master在博客目录下输入
1
hexo clean && hexo g && hexo d # 即可将博客部署到github上
稍等片刻,在浏览器上输入
https://myname.github.io,即可查看部署在github上的个人博客
SEO设置,登入相应的网站,获取site_verification字符串(本设置要先执行18,把网站部署到github或者个人vps、个人云服务器)
1
2
3
4
5
6
7
8
9
10
11
12
13
14
15
16
17
18
19
20
21
22
23
24
25
26
27
28# Disable Baidu transformation on mobile devices.
disable_baidu_transformation: false
# If true, site-subtitle will be added to index page.
# Remember to set up your site-subtitle in Hexo `_config.yml` (e.g. subtitle: Subtitle)
index_with_subtitle: false
# Automatically add external URL with Base64 encrypt & decrypt.
exturl: false
# Google Webmaster tools verification.
# See: https://www.google.com/webmasters
google_site_verification:
# Bing Webmaster tools verification.
# See: https://www.bing.com/webmaster
bing_site_verification:
# Yandex Webmaster tools verification.
# See: https://webmaster.yandex.ru
yandex_site_verification:
# Baidu Webmaster tools verification.
# See: https://ziyuan.baidu.com/site
baidu_site_verification:
# Enable baidu push so that the blog will push the url to baidu automatically which is very helpful for SEO.
baidu_push: false支持数学公式编辑
1
2
3
4
5
6
7
8
9
10
11
12
13
14
15
16
17math:
# Default (true) will load mathjax / katex script on demand.
# That is it only render those page which has `mathjax: true` in Front-matter.
# If you set it to false, it will load mathjax / katex srcipt EVERY PAGE.
per_page: true
# hexo-renderer-pandoc (or hexo-renderer-kramed) required for full MathJax support.
mathjax:
enable: true
# See: https://mhchem.github.io/MathJax-mhchem/
mhchem: false
# hexo-renderer-markdown-it-plus (or hexo-renderer-markdown-it with markdown-it-katex plugin) required for full Katex support.
katex:
enable: false
# See: https://github.com/KaTeX/KaTeX/tree/master/contrib/copy-tex
copy_tex: false添加文章阅读次数、站点访问次数、站点访问人数: next支持多种统计方式,这里使用busuanzi计数方法
1
2
3
4
5
6
7
8busuanzi_count:
enable: true
total_visitors: true
total_visitors_icon: fa fa-user
total_views: true
total_views_icon: fa fa-eye
post_views: true
post_views_icon: fa fa-eye本地搜索
- 安装依赖
1
npm install hexo-generator-searchdb -save
- 修改主题配置文件
1
2
3
4
5
6
7
8
9
10
11local_search:
enable: true
# If auto, trigger search by changing input.
# If manual, trigger search by pressing enter key or search button.
trigger: auto
# Show top n results per article, show all results by setting to -1
top_n_per_article: 1
# Unescape html strings to the readable one.
unescape: false
# Preload the search data when the page loads.
preload: false
- 安装依赖
设置评论系统: next主题支持多种评论系统,如disqus、changyan、valine、gitalk,这里使用了基于github的gitalk评论系统
- 在github中创建一个仓库来存放评论(如果博客托管到username.github.io上,可以直接使用你的username.github.io这个库),假设创建的库为
gitalk-comments - 在github application中申请一个oauth app:路径为 github -> settings -> Developer settings -> OAuth Apps -> New OAuth app。申请完后github会给这个OAuth生成一个
Client ID和Client Secret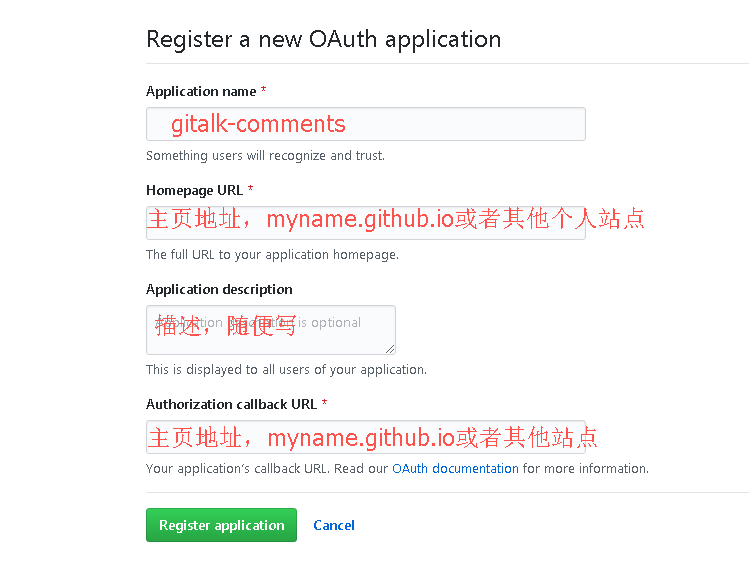
图4 gitalk配置 - 修改主题配置文件
1
2
3
4
5
6
7
8
9
10
11
12
13
14# Gitalk
# For more information: https://gitalk.github.io, https://github.com/gitalk/gitalk
gitalk:
enable: false
github_id: # 只填用户名
repo: # 填仓存放评论的库名
client_id: # 填上面获取的client_id
client_secret: # 填上面获取的client_secret
admin_user: # GitHub repo owner and collaborators, only these guys can initialize gitHub issues
distraction_free_mode: true # Facebook-like distraction free mode
# Gitalk's display language depends on user's browser or system environment
# If you want everyone visiting your site to see a uniform language, you can set a force language value
# Available values: en | es-ES | fr | ru | zh-CN | zh-TW
language: zh-CN
- 在github中创建一个仓库来存放评论(如果博客托管到username.github.io上,可以直接使用你的username.github.io这个库),假设创建的库为
字数统计、阅读时长统计
- 安装依赖
1
npm i hexo-wordcount --save
- 修改主题配置文件,加入下面的代码
1
2
3
4
5
6post_wordcount:
item_text: true
wordcount: true
min2read: true
totalcount: false
separated_meta: true - 修改
./themes/next/layout/_macro/post.swig文件,在 `` 前加入下面代码1
2
3
4
5
6
7
8
9
10
11
12
13
14
15
16
17
18<span class="post-time">
|
<span class="post-meta-item-icon">
<i class="fa fa-calendar-o"></i>
</span>
<span class="post-meta-item-text">字数统计:</span>
<span class="post-count">{{ wordcount(post.content) }}(字)</span>
</span>
<span class="post-time">
|
<span class="post-meta-item-icon">
<i class="fa fa-calendar-o"></i>
</span>
<span class="post-meta-item-text">阅读时长≈</span>
<span class="post-count">{{ min2read(post.content) }}(分)</span>
|
</span> - 重新执行
hexo clean && hexo g && hexo s,即可查看到下面的示例
图5 wordcount示例
- 安装依赖
博客代码托管到github私有库
如果博客托管到github上,当使用hexo d命令时,会将生成的静态页面等数据push到你的myname.github.io这个仓库,然而一些配置数据、文章数据等不会push上去,如果换电脑了或者环境了,就会显得非常不方便,这里新建一个github私有库来存放博客目录下的所有内容,当换了环境,直接从github上pull数据即可。- 新建一个私有库,如
my_blogs - 在博客目录下,执行
git remote add hexo git@github.com:usrname/reposname.git,将博客目录与远程私有库关联,这样写好一片文章或者做了一些修改,可以使用以下命令将内容push到远程私有库1
2
3git add .
git commit -m "message"
git push hexo master
- 新建一个私有库,如
生成并编辑about me页面:在博客目录下,执行
1
2
3
4hexo new page about
使用markdown格式编辑 ./source/about/index.md 这个文件;
编辑完使用hexo s即可在http://localhost:4000/about/看到about me页面内容
编辑博客内容
- 了解hexo三种layout: post、page、draft
- post:
- page:
- draft: 草稿,hexo new draft
; 写完了用 hexo publish